定制编译属于自己的OpenWRT固件
7 6 月, 2020 | 添加评论
软路由
之前自己配了一台软路由,J1900的cpu+4G内存,一直使用Koolshare的LEDE,但是koolss插件已经长期停止更新,而且各种问题,经常死机,说实话算不上一个很好的固件。
后来在网上找其他固件,发现LEAN的LEDE固件非常不错,主要是冲着SSR-plus去的,自己用ubuntu编译。作者的Github地址:https://github.com/coolsnowwolf/lede
准备工作
注意:不要用root用户git和编译!!!国内用户编译前最好准备好梯子,默认登陆IP 192.168.1.1, 密码 password
Ubuntu新建账户
需要准备一个干净的Ubuntu,不能用root账户,最好在国外。我用的是GCP的VPS,ubuntu 18.04。
1、创建用户:ywj27为用户名
sudo useradd ywj27
2、为创建的用户设置密码
sudo passwd ywj27
3、修改用户的权限
(1)为sudoers增加写入权限
      sudo chmod +w /etc/sudoers
      sudo vim /etc/sudoers
(2)为用户XXX添加读写权限
      # User privilege specification
      root ALL=(ALL:ALL) ALL
      ywj27 ALL=(ALL:ALL) ALL    // 这一行为新添加的代码
(3)将sudoers文件的操作权限改为只读模式
安装必备组件
sudo apt-get update
sudo apt-get -y install build-essential asciidoc binutils bzip2 gawk gettext git libncurses5-dev libz-dev patch python3.5 python2.7 unzip zlib1g-dev lib32gcc1 libc6-dev-i386 subversion flex uglifyjs git-core gcc-multilib p7zip p7zip-full msmtp libssl-dev texinfo libglib2.0-dev xmlto qemu-utils upx libelf-dev autoconf automake libtool autopoint device-tree-compiler g++-multilib antlr3 gperf wget swig
开始编译
Clone源码,使用
cd /
sudo git clone https://github.com/coolsnowwolf/lede.git
下列插件下载后上传到
cd /lede/package/lean
Adguard Home插件
sudo git clone https://github.com/rufengsuixing/luci-app-adguardhome
OpenClash插件
sudo git clone https://github.com/vernesong/OpenClash
KoolProxyR plus+插件(替换为 @大榕树摄氏度 推荐的某大佬版本)
sudo git clone https://github.com/jefferymvp/luci-app-koolproxyR
OpenAppFilter
https://github.com/destan19/OpenAppFilter
进入目录,配置编译
cd /
cd lede
sudo chmod 777 lede
./scripts/feeds update -a
./scripts/feeds install -a
make menuconfig
下载dll库
make -j8 download V=s
下载dl库(国内请尽量全局科学上网)
配置固件
之后进入如下界面,这实际上是一个配置界面,用来配置编译的配置,并不是编译的过程。
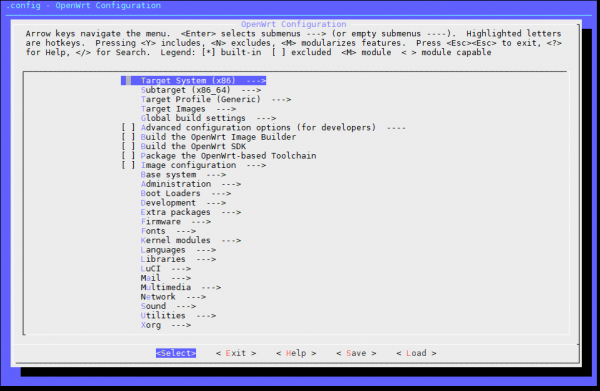
进入Target System和Subtarget勾选你需要编译的平台,我用的是X86,并且是64位的,所以你需要选择自助选择。
OpenWrt Configuration【OpenWrt配置】

Target System (x86)  --->   目标系统(x86)
Subtarget (x86_64)  --->   子目标(x86_64)
Target Profile (Generic)  --->目标配置文件(通用)
Target Images  ---> 保存目标镜像的格式
Global build settings  --->      全局构建设置
Advanced configuration options (for developers)  ---- 高级配置选项(适用于开发人员)
Build the OpenWrt Image Builder 构建OpenWrt图像生成器
Build the OpenWrt SDK构建OpenWrt SDK
Package the OpenWrt-based Toolchain打包基于OpenWrt的工具链
Image configuration  --->图像配置
Base system  --->     基本系统
Administration  --->     管理
Boot Loaders  --->引导加载程序
Development  --->   开发
Extra packages  --->  额外包
Firmware  --->固件
Fonts  --->字体
Kernel modules  --->  内核模块
Languages  --->语言
Libraries  --->  图书馆
LuCI  --->      LuCI
Mail  --->邮件
Multimedia  --->多媒体
Network  --->网络
Sound  ---> 声音
Utilities  --->实用程序
Xorg  --->Xorg
进入Target Images勾选你需要的固件格式等(img、vmdk等这里我保持默认,默认也够用了吧?)
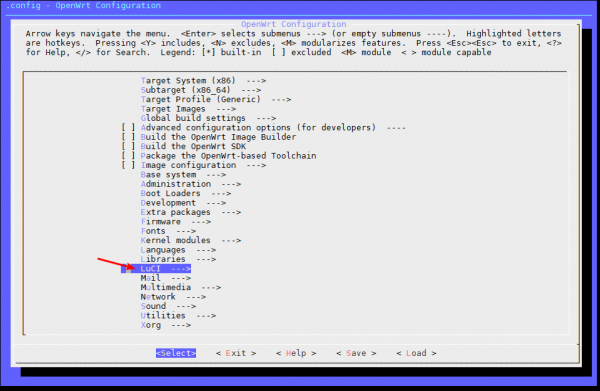
在这里有一些别的选项,比如一些VPN、aria2的web管理等等,根据需要自己进去研究。
勾选完需要的东西就可以退回第一个界面保存退出,保存按默认的文件名称(.config)保存即可,不需要修改。编译会根据.config的内容编译,想要恢复到初始配置删掉.config文件即可。
在编译的过程中,要下载一些组件什么的,如果你不翻墙,下载速度会非常慢,甚至下载不下来。
编译,保存后执行以下命令
make -j1 V=s //第一次编译非常的慢,要花上几个小时
取得固件
cd /lede/bin/targets/x86/64 注:这个bin目录在你克隆源码的lede路径下,非根目录下的bin目录
在下载openwrt系统时,经常能看到initramfs-kernel.bin,squashfs-factory.bin,squashfs-sysupgrade.bin等结尾的文件,factory适用于从原厂系统刷到openwrt,sysupgrade则是从openwrt刷到openwrt(已经是openwrt系统,在openwrt系统中更新自己),squashfs则是一种文件系统,适用于嵌入式设备。那么initramfs-kernel又是什么呢。initramfs是放在内存RAM中的rootfs 映像文件,跟kernel放在一起。一般来说用不到initramfs-kernel.bin来刷机,因为启动后,所有的配置在路由器重启后都不能保留(毕竟ram文件系统,所有文件放在ram中,断电就没了)。但也有用到initramfs-kernel.bin的时候,就是在移植openwrt系统的时候,没有设备上的flash闪存的驱动的时候。
固件里面看不到ssr-plus
大佬在feeds里把ssr的feed隐藏了
src-git luci https://github.com/coolsnowwolf/luci
src-git routing https://git.openwrt.org/feed/routing.git;openwrt-19.07
#src-git telephony https://git.openwrt.org/feed/telephony.git;openwrt-19.07
#src-git helloworld https://github.com/fw876/helloworld  把这一行的#注销
src-git lienol https://github.com/Lienol/openwrt-package  加入这一行
重新编译或修改配置后再次编译
(二次编译是指下一次你编译别的固件的时候)
cd lede
git pull
./scripts/feeds update -a && ./scripts/feeds install -a
make defconfig
make -j8 download
make -j$(($(nproc) + 1)) V=s
